I replaced all my speakers in my base GR86 (non-amp 6 speaker system). Here is what I did and some tips. If you have any questions, please reply and I will try to help you.
1.Dash speakers: Base includes 1” paper low volume tweeters that actually are barely noticeable with full sound from door speakers. These are 4ohm and run in parallel with door speakers which are also 4ohm, resulting in a 2ohm load. I replaced dash tweeters with 4” Polk DB402 coaxial speakers that have a 3/4” silk dome tweeter. They also have a high sensitivity of 90db which is great for a low watt factory head unit. I actually kept the old tweeters in the speaker grill and just detached them. The opening I installed the 4” speaker in is under the speaker grill on dash. The opening can allow for a 3.5” cutout for a small 4” or a 3.5” speaker. I chose Polk DB402 speakers which have a 3.5 top mount width. Most others are slightly larger. The depth is limited to 1.75 inches and these speakers actually just fit where the base rests against the ventilation tubs in the dash. They are almost drop in, but you need to modify the 45 degree slope support and connection point as the speaker basket arm hits it slightly. You need to shave off about 1/8 to 1/4 of the plastic with a razor blade. You will know you have enough cut off when the speaker holes and dash holes line up and speaker sits flush with molded curve on the dash. You also need some U clips as the ones that come with speakers are too small. I looked everywhere and Harbor Freight had #10 ones that fit perfectly! You only use 2 of the 4 speaker mount tabs/ears. You just simply break/cut off the two not needed (this is by design and documented). Also I got a metra harness for free with the speakers from Crutchfield and had to do a chat since they didn’t automatically include them for free at first. They fit perfectly. I wrapped up the slack of the speaker wire adapter and tucked in corner of dash to prevent rattles etc. I also applied foam 3/8” strip around opening under factory grill, about 5” diameter. The spreaker grills just pry off by the way, as you can see in various YouTube videos.
Polk 4” DB402:
https://www.crutchfield.com/p_107DB402/Polk-Audio-DB-402.html
Metra 72-8110:
https://www.crutchfield.com/p_120728110/Metra-72-8110-Speaker-Wiring-Harness.html
U Clips:
https://www.harborfreight.com/170-piece-u-clip-and-screw-assortment-67588.html
![Image]()
![Image]()
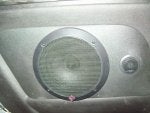
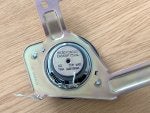
2. Rear speakers: Base has 2.5” 6ohm paper speakers in the rear. Not only are these only 2.5”, being 6ohm, their volume is low too compared to the 2ohm load up front. These have a high pass filter applied at the head unit. The filter appears to be around 150-250Hz. The bracket is different than the premium GR86, which uses the previous gen 3.5” bracket. But the bracket connects to the same locations. I ended up buying a set of 3.5” speakers and brackets from a previous gen 2019 Toyota 86 on ebay. Then I took the speakers off these used prev gen brackets, threw them out, and modified the brackets to install 4” coaxial Polk DB402 speakers on them. I modified the prev gen brackets with a hacksaw and Dremel as the opening is about 3.25” and Polk 4” have an opening of 3.5”. The basket arms basically need some room, but the speaker fits flush after modifying. These Polks have 3/4 silk dome tweeters. They are also 4ohm and 90db sensitivity so they will play louder at same watts. Crutchfield has the speaker adapters for these for free and they fit perfectly. I also used foam around the speaker and trimmed the factory padding behind the rear panels. I used YouTube videos to dismantle the seats and rear panels but it is pretty straight forward. Just a tip, when removing the panels do quick firm tugs to pop them off rather than trying to slowly pry to reduce risk of bending/warping retainers and plastic panel.
Polk 4” DB402:
https://www.crutchfield.com/p_107DB402/Polk-Audio-DB-402.html
Metra 72-8105
https://www.crutchfield.com/p_120728105/Metra-72-8105-Speaker-Wiring-Harnesses.html
![Image]()
![Image]()
![Image]()
![Image]()
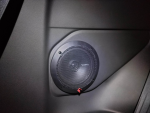
Door speakers: Base has 6.5” full range paper speakers. These are 4ohm that run in parallel with dash, resulting in a 2ohm load. I replaced these with Polk DB652 speakers. These have silk dome tweeters and also have a sensitivity of 92 which is great for a lower to the ear door speaker running off a factory head unit. I got a Metra speaker harness that fit perfectly. I also got Scosche SAT6 brackets. With these brackets you have no extra room to add extra baffle/seal between door and speaker and speaker and bracket. Both harnesses and brackets are free from Crutchfield. I added a thin layer of foam rubber on edge of the speaker so that it basically rests against the molded ring inside of the door. If you want more room you need a different bracket or trim the circle molded inside the door panel. After attaching the harness (feeds out top) I bundled the slack and taped it to door plastic above the speaker (not shown in photos). Door panels can be removed by removing 3 screws and pulling it off. There is a screw behind the cover behind the interior door lever. Remove the cover by prying at area next to manual lock swich. Remove the screw. The other 2 screws are under a cover in the recess of the door arm/handle. After popping off the thin panel with a flat head screwdriver, remove the 2 screws. All that is left is to tug the panel to release the door clips. Do this with firm quick bursts (don’t pry it slowly or you could warp/stretch plastic etc. I would start near the hinge and then bottom and work your way up. When putting panel back on, verify all panel clips came off with door cover, and remove any from door frame and install back on cover as needed.
Polk 6.5” DB652:
https://www.crutchfield.com/p_107DB652/Polk-Audio-DB-652.html
Metra 72-8104:
https://www.crutchfield.com/p_120728104/Metra-72-8104-Speaker-Wiring-Harnesses.html
Scosche SAT6:
https://www.crutchfield.com/S-8CFwqVFfRBT/p_142SAT6/Scosche-SAT6-Speaker-Mounting-Brackets.html
![Image]()
![Image]()
![Image]()
![Image]()
1.Dash speakers: Base includes 1” paper low volume tweeters that actually are barely noticeable with full sound from door speakers. These are 4ohm and run in parallel with door speakers which are also 4ohm, resulting in a 2ohm load. I replaced dash tweeters with 4” Polk DB402 coaxial speakers that have a 3/4” silk dome tweeter. They also have a high sensitivity of 90db which is great for a low watt factory head unit. I actually kept the old tweeters in the speaker grill and just detached them. The opening I installed the 4” speaker in is under the speaker grill on dash. The opening can allow for a 3.5” cutout for a small 4” or a 3.5” speaker. I chose Polk DB402 speakers which have a 3.5 top mount width. Most others are slightly larger. The depth is limited to 1.75 inches and these speakers actually just fit where the base rests against the ventilation tubs in the dash. They are almost drop in, but you need to modify the 45 degree slope support and connection point as the speaker basket arm hits it slightly. You need to shave off about 1/8 to 1/4 of the plastic with a razor blade. You will know you have enough cut off when the speaker holes and dash holes line up and speaker sits flush with molded curve on the dash. You also need some U clips as the ones that come with speakers are too small. I looked everywhere and Harbor Freight had #10 ones that fit perfectly! You only use 2 of the 4 speaker mount tabs/ears. You just simply break/cut off the two not needed (this is by design and documented). Also I got a metra harness for free with the speakers from Crutchfield and had to do a chat since they didn’t automatically include them for free at first. They fit perfectly. I wrapped up the slack of the speaker wire adapter and tucked in corner of dash to prevent rattles etc. I also applied foam 3/8” strip around opening under factory grill, about 5” diameter. The spreaker grills just pry off by the way, as you can see in various YouTube videos.
Polk 4” DB402:
https://www.crutchfield.com/p_107DB402/Polk-Audio-DB-402.html
Metra 72-8110:
https://www.crutchfield.com/p_120728110/Metra-72-8110-Speaker-Wiring-Harness.html
U Clips:
https://www.harborfreight.com/170-piece-u-clip-and-screw-assortment-67588.html
2. Rear speakers: Base has 2.5” 6ohm paper speakers in the rear. Not only are these only 2.5”, being 6ohm, their volume is low too compared to the 2ohm load up front. These have a high pass filter applied at the head unit. The filter appears to be around 150-250Hz. The bracket is different than the premium GR86, which uses the previous gen 3.5” bracket. But the bracket connects to the same locations. I ended up buying a set of 3.5” speakers and brackets from a previous gen 2019 Toyota 86 on ebay. Then I took the speakers off these used prev gen brackets, threw them out, and modified the brackets to install 4” coaxial Polk DB402 speakers on them. I modified the prev gen brackets with a hacksaw and Dremel as the opening is about 3.25” and Polk 4” have an opening of 3.5”. The basket arms basically need some room, but the speaker fits flush after modifying. These Polks have 3/4 silk dome tweeters. They are also 4ohm and 90db sensitivity so they will play louder at same watts. Crutchfield has the speaker adapters for these for free and they fit perfectly. I also used foam around the speaker and trimmed the factory padding behind the rear panels. I used YouTube videos to dismantle the seats and rear panels but it is pretty straight forward. Just a tip, when removing the panels do quick firm tugs to pop them off rather than trying to slowly pry to reduce risk of bending/warping retainers and plastic panel.
Polk 4” DB402:
https://www.crutchfield.com/p_107DB402/Polk-Audio-DB-402.html
Metra 72-8105
https://www.crutchfield.com/p_120728105/Metra-72-8105-Speaker-Wiring-Harnesses.html
Door speakers: Base has 6.5” full range paper speakers. These are 4ohm that run in parallel with dash, resulting in a 2ohm load. I replaced these with Polk DB652 speakers. These have silk dome tweeters and also have a sensitivity of 92 which is great for a lower to the ear door speaker running off a factory head unit. I got a Metra speaker harness that fit perfectly. I also got Scosche SAT6 brackets. With these brackets you have no extra room to add extra baffle/seal between door and speaker and speaker and bracket. Both harnesses and brackets are free from Crutchfield. I added a thin layer of foam rubber on edge of the speaker so that it basically rests against the molded ring inside of the door. If you want more room you need a different bracket or trim the circle molded inside the door panel. After attaching the harness (feeds out top) I bundled the slack and taped it to door plastic above the speaker (not shown in photos). Door panels can be removed by removing 3 screws and pulling it off. There is a screw behind the cover behind the interior door lever. Remove the cover by prying at area next to manual lock swich. Remove the screw. The other 2 screws are under a cover in the recess of the door arm/handle. After popping off the thin panel with a flat head screwdriver, remove the 2 screws. All that is left is to tug the panel to release the door clips. Do this with firm quick bursts (don’t pry it slowly or you could warp/stretch plastic etc. I would start near the hinge and then bottom and work your way up. When putting panel back on, verify all panel clips came off with door cover, and remove any from door frame and install back on cover as needed.
Polk 6.5” DB652:
https://www.crutchfield.com/p_107DB652/Polk-Audio-DB-652.html
Metra 72-8104:
https://www.crutchfield.com/p_120728104/Metra-72-8104-Speaker-Wiring-Harnesses.html
Scosche SAT6:
https://www.crutchfield.com/S-8CFwqVFfRBT/p_142SAT6/Scosche-SAT6-Speaker-Mounting-Brackets.html